Lesson 37 - Routing Information Protocol Part3
Lesson 37 - Routing Information Protocol Part3
First, I would like to thank all of you who took the time to read my posts and left some comment. Your feedback means a lot to me and helps me keep up with this little project of mine. I really appreciate it. Thanks a million folks!
In this post, I'm going to finish the RIP fundamentals by showing you RIPv2 in action. After reading this, you will see the major differences presented in the lesson 35 (table1) in practice. Also, I want to present the authentication of RIP packets which protects the RIP domain from being poisoned with false routes.
I'm going to use the same topology diagram as in previous lessons. Currently, the routers are running RIPv1. If you read my previous post, you saw the routing problems we ran into as RIPv1 does not advertise network masks along with IP addresses. The rules for sending and receiving updates are explained in lesson 36.
As you remember, the subnets: 172.31.3.0/28 and 172.31.3.16/28 have not been advertised by RIPv1. There are a few solutions to this problem, but none of them can be resolved using RIPv1. The simplest solution is to use RIPv2 which is classless routing protocol.
Our current RIPv1 configuration looks like this (here: R1 given as and example).
Now, let's enable RIPv2. Below is an example of R1's configuration. The two highlighted commands are now added on all routers in the topology.
R1 configuration:
If you display the running configuration of R1, it is going to look like the one below :
Notice, the 'send and receive version'. Only RIPv2 updates will be sent and accepted now. Also, 'Automatic network summarization is not in effect' tells us that 'no auto-summary' command has been used. Also, both loopback interfaces are listed as 'Passive interface(s)'.
R3 Configuration:
WARNING!
Extreme care must be taken when using any debug commands on the production equipment. After the diagnostics have been completed, the debug command(s) must be turned off immediately.
All 'debug' commands are VERY dangerous if used on the production routers. They have enormous impact on the CPU and can potentially crash the device. They are typically used as the commands of the last resort during troubleshooting of a given technology when problem cannot be resolved without data they provide. So we tend to use them only in situations when we cannot do any more damage than there has already been done :-).
Almost all routing protocols allow to authenticate their packets. This is an extra security mechanism used to protect your routing domain. It is easy to install a routing protocol on a computer and poison the routing domain with illegitimate prefixes. This can disrupt the operation of the whole routing domain.
RIP offers two ways of authenticating their packets:
There are three major steps to configure authentication in RIP:
This configuration must be identical on all routers in the RIP domain. Here, I present the configuration on R3.
Step 1
Create a key chain. The name of the key chain (here: RIP).
Step 2
Configure at least one key-string (password) in the key chain (must be identical on all routers). I do not use additional options allowing the key-string to timeout. The password used is valid forever.
Step 3
Apply the key chain on the appropriate interface(s). Here the packets must be authenticated between R1 and R2 routers so interface F1/0 will use the key chain.
If you display information about RIP again, you will notice that authentication of RIP packets has been enabled.
Check it out:
Once I have configured identical authentication on all routers, here is the debug output showing that R1 is sending RIP packets with proper authentication.
In the next post, I will start exploration of, arguably, the most commonly used routing protocol OSPF.
In this post, I'm going to finish the RIP fundamentals by showing you RIPv2 in action. After reading this, you will see the major differences presented in the lesson 35 (table1) in practice. Also, I want to present the authentication of RIP packets which protects the RIP domain from being poisoned with false routes.
I'm going to use the same topology diagram as in previous lessons. Currently, the routers are running RIPv1. If you read my previous post, you saw the routing problems we ran into as RIPv1 does not advertise network masks along with IP addresses. The rules for sending and receiving updates are explained in lesson 36.
Pic. 1 - Topology Diagram.
Icons designed by: Andrzej Szoblik - http://www.newo.plAs you remember, the subnets: 172.31.3.0/28 and 172.31.3.16/28 have not been advertised by RIPv1. There are a few solutions to this problem, but none of them can be resolved using RIPv1. The simplest solution is to use RIPv2 which is classless routing protocol.
Our current RIPv1 configuration looks like this (here: R1 given as and example).
Pic. 2 - R1's RIPv1 configuration
Now, let's enable RIPv2. Below is an example of R1's configuration. The two highlighted commands are now added on all routers in the topology.
R1#configure terminal
R1(config)#router rip
R1(config-router)#version 2
R1(config-router)#no auto-summary
R1(config-router)#network 172.31.0.0
R1(config-router)#passive-interface loopback1
R1(config-router)#passive-interface loopback1
R1(config-router)#end
R1#
- version 2 - Enables RIPv2.
- no auto-summary - Disables automatic summarization to a class boundary.
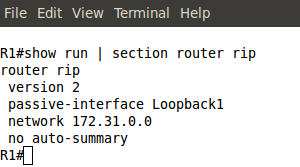
If you display the running configuration of R1, it is going to look like the one below :
Pic. 3 - R1's RIPv2 Configuration.
Now, let's look at the output of 'show ip protocols' on R3. You can compare it with RIPv1 output in the previous post (lesson 36).Notice, the 'send and receive version'. Only RIPv2 updates will be sent and accepted now. Also, 'Automatic network summarization is not in effect' tells us that 'no auto-summary' command has been used. Also, both loopback interfaces are listed as 'Passive interface(s)'.
Pic. 4 - RIPv2 Information on R3.
It is also a good idea to see RIPv2 advertisements. Again, be careful using 'debug' commands. For better output, I have also disabled the time stamps:R3 Configuration:
R3#configure terminal
R3(config)#no service timestamps
R3(config)#end
WARNING!
Extreme care must be taken when using any debug commands on the production equipment. After the diagnostics have been completed, the debug command(s) must be turned off immediately.
All 'debug' commands are VERY dangerous if used on the production routers. They have enormous impact on the CPU and can potentially crash the device. They are typically used as the commands of the last resort during troubleshooting of a given technology when problem cannot be resolved without data they provide. So we tend to use them only in situations when we cannot do any more damage than there has already been done :-).
Pic. 5 - RIPv2 Debug Output on R3.
- Sending and receiving update using version 2.
- Received networks/subnets via 0.0.0.0 mean that the advertising router (here: 172.31.123.2) is the best gateway to the given destination.
- Sending v2 update uses reserved multicast destination IP address 224.0.0.9 rather than broadcast.
Almost all routing protocols allow to authenticate their packets. This is an extra security mechanism used to protect your routing domain. It is easy to install a routing protocol on a computer and poison the routing domain with illegitimate prefixes. This can disrupt the operation of the whole routing domain.
RIP offers two ways of authenticating their packets:
- Simple Password (clear text) authentication.
- MD5 based (one-way algorithm) authentication.
There are three major steps to configure authentication in RIP:
- Configure a key chain - It allows to create multiple keys which can be changed automatically if the routers have the time synchronized. The name of the key chain does NOT have to be identical on all routers.
- Configure at least one key-string (password) in the key chain - Key number MUST be identical on all routers in the RIP domain. Also, the password (key-string) used for authentication must be identical on all routers.
- Apply the key chain - You must apply the key chain on the interfaces where RIP advertisements will be exchanged between the neighbors.
This configuration must be identical on all routers in the RIP domain. Here, I present the configuration on R3.
Step 1
Create a key chain. The name of the key chain (here: RIP).
R3#configure terminal
R3(config)#key chain RIP
R3(config)#key chain RIP
R3(config-keychain)#
Step 2
Configure at least one key-string (password) in the key chain (must be identical on all routers). I do not use additional options allowing the key-string to timeout. The password used is valid forever.
R3(config-keychain)#key 1
R3(config-keychain-key)#key-string secret123
R3(config-keychain-key)#exit
R3(config-keychain)#exit
R3(config)#
Step 3
Apply the key chain on the appropriate interface(s). Here the packets must be authenticated between R1 and R2 routers so interface F1/0 will use the key chain.
R3(config)#interface f1/0
R3(config-if)#ip rip authentication mode md5
R3(config-if)#ip rip authentication key-chain RIP
R3(config-if)#end
R3#
If you display information about RIP again, you will notice that authentication of RIP packets has been enabled.
Pic. 6 - RIPv2 Authentication.
If neighbors (R1 and R2) do not sign their packets using the same key number and key-string, R3 is going to reject their advertisements. Both R1and R2 send their update without authentication. The result is that R3 must ignore them.Check it out:
Pic. 7 - Invalid Authentication.
Pic. 8 - Authenticated RIPv2 Update from R1.


Comments
Post a Comment